Search This Blog

Tuesday 30 November 2010

Assignment (Unit 101-105) - WWII Shoot - Day 1 Evaluation

Hitler and I had the same problem... 

Now I know I shouldn't be comparing myself to Hitler, for one I am much taller and better looking (in my opinion) and I'm not a genocidal maniac (and have no ambitions to be either).  He was a very naughty boy.  Where it all went wrong for old Adolf is in the ambition (and I guess the mental illness didn't help either) and I'm starting to think I may have bitten off more than I can chew too.


After looking through all the shots from the first day's shoot and having a good long think about my current achievements, I would have to say I'm a tad disappointed.  My shots just didn't have the sharpness I was hoping for, whether this is down to my choice of settings or whether it's down to the crapness of my lens I'm not sure.  It best be the settings (I'm sure that must be it) because I cant afford to buy another lens.  I took a lot of pictures and only thought a couple of them were fairly decent.  Even the decent ones were a bit disappointing upon closer expection.

The problem is, the screen on my camera lied to me.  When viewing back my pictures on the camera they seemed OK.  When I downloaded them to my laptop it all went horribly wrong.  My camera had been playing tricks on me.  Now I know you shouldn't trust the LCD monitor but I was surprised at how different the images were on a better screen.  Even my cameras histogram was playing me for a fool.

Another problem I have had has only become apparent when printing out some of my images.  The colours of my pictures look completely different when printed.  I don't understand why this is happening but it's really annoying the hell out of me.  The colours and brightness appear differently on print.  This is a major concern and one that I hope doesn't spoil my final images.  I have set up my printer to let photoshop manage the colours and this has made some improvements but it's definitely something I need to look further into.

f/5.6 1/8sec ISO-100
This is a bit of a blow for me and my high expectations but I'll have to put things right on Sunday when I go back out to do more shooting.  At least now I know where the good spots in the woods are, I know batteries are kind of important and I know a good choice of footwear is essential (trainers and big puddles of mud do not interact well).

f/5.6 1/2sec ISO-100
I guess I have just got to keep plugging away until I get that magic shot.  I'm sure it will be worth it in the end.

War is hell people!

Amen.


Monday 29 November 2010

Assignment (Unit 101-105) - WWII Shoot - Day 1

It was a really cold Sunday morning when I finally decided to do some work on my WWII assignment.  With a McDonald's breakfast sitting nicely in my belly I headed out into Baddesley woods with my friend Dave dressed in full military gear.  We must have looked like a right couple of idiots.

To achieve most of my shots I decided I would need to take my trusty tripod as I figured shooting under the cover of the trees would mean I would need a slow shutter speed.  This was necessary as I wanted to use a low ISO to keep my images at a decent quality.

Along with my tripod I took my Sony Alpha 200 DSLR with my Sony DT 18-70mm f3.5-5.6 lens and my Sigma 70-300mm f4-5.6 APO DG MACRO lens.  I also took my Remote Shutter Release cable for those slow shutter shots.

After being harassed by some dogs and having a bit of a chat to the owners (who seemed interested in what I was doing in a "Please don't kill me," kind of way) I set myself up, fired off some test shots to get the right settings and off I went.

f/5.6 1/8sec ISO-100
These two shots came out OK.  I didn't really have to do much to them in photoshop apart from changing the colours.  Using the 'black & white' option in the adjustments menu I played around with the settings until I was happy with the result.  I also added a slight tint to the pictures just to add some tones.  I added some noise to the top picture but left the bottom one.  I love the look of seriousness on Dave's face.  Brilliant.
f/5.6 1/10 sec ISO-100
I love close up photography and I decided to stick my camera right in Dave's face for this next one.  I was kind of hoping to mirror Don McCullin's photograph of the Shell shocked marine but things didn't seem to fall into place. 
With this picture, after converting it to black and white I used the dodge and burn tools to manipulate the image slightly.

f/5.6 1/8sec ISO-100

The next picture (below) is actually three different shots layered together.  I wanted to give the image that there were a few soldiers wondering about.  I'm not sure I like this picture though.  On a small scale it looks OK but when I look in great detail it doesn't look right. 

f/5.6 1/8sec ISO-100 front soldier
f/5.6 1/10sec ISO-100 main pic
f5.6 1/10sec ISO-100 crouched soldier


f/5.6 1/4sec ISO-100
The woods near Baddesley are full of these remains of buildings which make for great scenery.  For this shot I set my tripod up right next to a fallen branch.  I like how the branch leads us towards the soldier up against the wall.  This was one of my favourite shots from the day and it was one of the first. 

It was at this point that I was interrupted by a family of dog walkers.  They didn't see Dave until the last moment which goes to show, camouflage works.

Once again I edited the colours in the 'black & white' menu and tinted the image slightly.  Apart from slightly adjusting the contrast that's all I really needed to do for this image.
 
f/5.6 1/8sec ISO-100

I then tried to get a picture of Dave breathing out into the cold air.  All my attempts didn't turn out too well.  They were either too blurry or just didn't capture what I was going for.  I decided to see what would happen if I used a filter on one of the blurry pictures.  I then selected the 'poster edges' filter from the filters menu.  This kind of gave the picture a graphic novel feel.  Kind of cool but not really what I'm looking for.

I really enjoyed the day apart from the freezing cold and I have a lot of pictures to look through.  My only main problem was the fact my battery ran out.  Like a fool I left my camera switched on the night before. 

Next Sunday I'm heading back into the woods to do more shooting and hopefully I can do my centerpiece.

I'm looking forward to it.

Thursday 25 November 2010

Assignment (Unit 101-105) - Research - W. Eugene Smith

W. Eugene Smith


More than just a War photographer, W. Eugene Smiths ability to adapt his skills in any given environment made him one of the great photojournalists of his time.  His photographs always seem to give off a dream-like quality to me, not so much the war images, but his later works.  Many of the images he captured, although very gritty and very real, seem like they are set in some kind of fantasy.

His war photography is often brutally vivid.  However this picture of a U.S. marine and a baby is a heartbreaking reminder that war effects everyone from brothers to sisters, mothers to fathers and helpless children have all been victims of global conflict.  It's such a simply effective message that screams out of the frame at you. 

Smith seemed to get right into the action with his camera and there's no escaping some of the horrors of this war.  At least we can simply look away.  Smith himself didn't escape without harm as he was injured by mortar fire before returning to America.


Marine Demolition Team Blasting Out a Cave on Hill 382, Iwo Jima, 1945 simply shows the immense destructive power of war.  I love the way Smith captured this explosion at exactly the right second.  The way the soldiers are shielding themselves from the blast makes this photo.  The composition and bleakness of the black and white film make this an unforgettable image.


Below, The Walk To Paradise Garden is perhaps the most dreamy of Smith's compositions.  I just love the way the two children are heading 'into the light'.  It has been said that this image captures the whole life cycle in one shot.  I can see why.  It's like the children are on their way to some kind of heaven.  The way the surrounding trees and bushes frame the subject's makes this a perfect shot.  This kind of compliments the above shot.  Dont get me wrong, the subject matter is completely different, the man in the photo above is a worker in a detergent factory.  Somehow, Smith makes this basic image of a man working in what must be horrible conditions look as beautifully poetic as the bottom picture.  I get the feeling that the above worker is escaping to his own personal heaven.  At least until his next shift anyway.


"I am a compassionate cynic, yet I believe I am one of the most affirmative photographers around. I have tried to let the truth be my prejudice. It has taken much sweat. It has been worth it." - 
W. Eugene Smith

Photoshop Task 2

Filters


Photoshop has many useful filters which are just a click away.  By accessing the Filter menu you can have a play around and create cool and unusual effects.  Here's a selection of some of my favourites.


Top row, left to right are - (Artistic) Poster Edges, (Artistic) Watercolour, (Stylized) Glowing Edges,
Bottom row, left to right are - (Distort) Ripple, (Artistic) Plastic Wrap, (Artistic) Sumi-e


Top row, left to right are - (Artistic) Rough Pastels, (Artistic) Sponge, (Artistic) Smudge Stick,
Bottom row, left to right are - (Artistic) Pallet Knife, (Distort) Diffuse Glow and finally (Brush Strokes) Dark Strokes.

As you can tell, I like the artistic ones the most.

Sepia


Converting images to sepia gives photographs a great old look. You can do this in a variety of ways.  The most simple way that I have found of doing this is to use the Image - Adjustments - Hue/Saturation tool.


There are other ways to achieve this effect but I find this way is the easiest.  The other way I have achieved these results is by using the black and white option from the adjustments menu and selecting the tint option at the bottom.


Merging Layers

This is where all the fun happens.  By cutting and pasting images into layers you can create some fantastic pictures.  To do this can take a lot of time and can be a tad tedious.


Using these awe inspiring pictures I decided to try and make something a bit more interesting.  Firstly, I took the clouds and using the cropping tool I selected  part of the image to use as my background.  Then I accessed the new layer option in the 'LAYER' menu and added my chessboard.  I used the magnetic lasso tool to select just the board and nothing else.

At this point I would love to show you some screen grabs but my laptop was having none of it.

I again used the magnetic lasso tool to cut around the photograph of the statue.  Using the transform controls in the 'EDIT' menu I straightened her up a bit and popped her into the picture.

At this point I could have flattened the layers and adjusted the colours but I decided to do each layer individually.  Using the 'IMAGE' menu, I selected the adjustments option and went straight to the 'black and white' option.  I then decided to add a tint to the picture by ticking the little 'tint' box.  I was happy with the moody look this gave me.

With the chess board and the statue I decided to play around with filters and selected one that enhanced my image.  I couldn't tell you which one it was because I was too busy going, "Wow that looks cool," to myself.
Anyway, here's the final image.  I'm not sure how it will look on a proper monitor because we all know laptops are a big piece of crap when it comes to these things.  Whatever angle you have the screen at, the picture looks completely different.  I can always play around with the brightness at a later date although I was trying to go for a dark moody image.


Text


Next up, adding text.  This can be done really easily by clicking on the 'T' icon in the photoshop toolbar. You can even warp the text, change directions and colour.  Here's a cover I did for a CD for my bands first EP (did I mention I was in a band? Oh I did, I apologise!).


We were going to have a cat sitting in front of the gramophone or even a dog weeing up it as a big "Up yours" to HMV.  We then realised we are nice people and would never do such a thing, plus HMV have never done anything to us, once they did sell me a faulty DVD though.  I couldn't take it back either because I lost the receipt. 

I would like to show you more but as I said, my laptop isn't playing ball today so I cant show any screen grabs.  And I thought Apple Mac's were annoying.


Wednesday 24 November 2010

Assignment (Unit 101-105) - Research - Diane Arbus

Diane Arbus

As far as portrait photography goes, I think Diane Arbus' approach is the most fascinating.  Arbus took photographs of predominately marginal people.  Where most portrait photographers take photographs of beautiful people, Arbus took photo's of transvestites, dwarfs, giants and circus 'freaks'.  Her work has been seen as somewhat controversial and Norman Mailer was quoted in 1971 as saying "Giving a camera to Diane Arbus is like putting a live grenade in the hands of a child."


Talking of hand grenades, Child With Toy Hand Grenade In Central Park, N.Y.C. is one of my favourite works by Arbus.  This picture says a lot to me about innocence and war.  Whether this was a political statement by Arbus is unclear.  Apparently while taking this photo, Arbus had asked the boy to stand there while she moved around him looking for the right angle.  The boy became impatient and shouted at her to "Take the picture already!"

Upon viewing the contact sheet for the picture, you can see Arbus experimented quite a lot before capturing this iconic image.  The composition eventually fell into place for her and she came away with a great shot.  It shows that it helps to be patient and just keep shooting until you get the results.  I feel that the picture wouldn't have had the same message if the child's frustrations hadn't some to fruition.


Identical Twins, Roselle, New Jersey, 1967 is a very subtle photograph that seemingly captures twin sisters Cathleen and Colleen Wade.  According to Arbus' biography, the image has been said to sum up Arbus' vision.  It seems to be a question of identity which is something that Arbus seems to address in many of her works.  It's a case of "Who am I, Who are you?"  The image of the twin girls has since been recreated many times over the years.  Most notably in Stanley Kubrick's film of Stephen King's The Shining.


I think its the simplicity of this image that makes it so fascinating.  There's no distracting backgrounds so your focus is entirely on the girls.


Arbus was always worried that she would be remembered only as "The photographer of freaks" which is probably what people do indeed think.  Unfortunately it's the images of 'freaks' that stand out the most from her large body of work.

A Jewish Giant at Home with His Parents in The Bronx, N.Y. 1970 shows the 'Jewish Giant' Eddie Carmel standing in the living room.  Arbus said "You know how every mother has nightmares when she's pregnant that her baby will be born a monster?... I think I got that in the mother's face." 

Compositionally, this is another simple shot.  I have seen so many pictures of families standing around in living rooms but what makes this image so iconic is the 'giant' who catches the eye immediately.  You are then swiftly drawn across to the parents and are greeted by that look of rejection on the face of the mother.  The whole photo seems to be burned or darkened around the corners which kind of frame the image quite nicely.  This keeps you focused on the central elements.  I don't feel that this picture is technically amazing or set up in any specific way.  It just shows that the subject matter makes or breaks a photo.

"I do feel I have some slight corner on something about the quality of things. I mean it's very subtle and a little embarrassing to me, but I really believe there are things which nobody would see unless I photographed them." - Diane Arbus

Monday 15 November 2010

Assignment (Unit 101-105) - Test Shots - WWII

Just a quick one...

After planning to go out into nature to do some test shots, my friend Dave decided it would be a better idea to drive two hours to North Wales to check out this store that sells war reenactment gear.  It did indeed turn out to be a better idea and we left for home safe in the knowledge that we had spent a hell of a lot of money and had no time to do any actual shooting.

When we finally made it home in the darkness I bullied my friend into trying all the stuff on, just to see how it would look on camera.  And here we are...


f/5.6 1/10sec ISO 400
I took all these shots in my living room.  Not a very good pace for WWII reenactments but it would have to do until we can get outdoors.  I quickly fired off some shots and had a play around on photoshop, just to see what the goods looked like after desaturating everything.

f/5.6 1/10sec ISO 400
I am pretty pleased with the things we have managed to collect so far.  This 101st Airborne jump suit is one of my favourite things we managed to find.  I messed about with the brightness and contrast and added some noise to try to take off some of the clarity.  With more time I am pretty sure the results will come.  

f/5.6 1/10sec ISO 400
Background f/5.6 1/160sec ISO 100

The above shot is two different pictures blended together.  I was getting a tad annoyed that my curtains were getting in the way so I found an old picture I had taken of a priory near where I live and just started stitching them together.  This is a trick that could come in handy later in my project.

I am pretty much ready to shoot my main piece now.  I'm quite happy with the amount of equipment I have and I'm pleasantly surprised at how good the uniforms look.  It's just a case of getting the right people in the right place at the right time.  It's just a shame stupid work gets in the way of my creativity.
It's been a long day.

Monday 8 November 2010

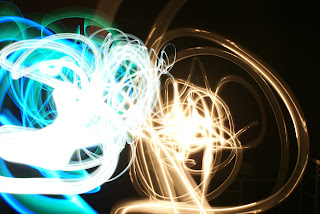
Light Writing

Recently my band (in which I play bass) spent three days and a lot of money recording two songs with our producer friend Joel.  Now the songs came out really well (and will be available for purchase for £1 from my car boot) and now we just need to sort out a CD cover.  After being inspired by last weeks lesson we decided to try and have a go at light writing again so we headed out into the darkness to play with our torches.  Errm!
f/8 30sec ISO100
Trying to write the band name was a difficult task.  My handwriting wasn't up to the challenge.  After several failed attempts and realising that my camera wasn't even facing me properly this one came out, well, lets just say this one came out.
f/8 30sec ISO100
f/8 25sec ISO 100

f/11 30sec ISO 400
f/8 30sec ISO 100
f5.6 1/40sec ISO 400
I really enjoyed running about and trying to create some striking images.  We even tried to be creative at times but it seemed to be a case of trial and error.  Now you may be thinking, "What the heck has that owl got to do with it?  You'll see.

After sifting through the seemingly endless amount of photographs it was time to turn to trusty photoshop for a bit of editing.  This is my favourite part of digital photography.  It's all about the manipulation.


The band initially liked the above idea, the bands name and the blue-lit wall had a nice effect.  Upon printing out the image however some of the detail was lost.  Not to mention it would use up a hell of a lot of ink.  We are on a tight budget here people.  Just to see what would happen, I inverted the image in photoshop which produced this next look which would be a much more ink friendly effort.


This got me thinking and so I started to have a play around with some of the other images.  Again I inverted the colours and did some tight cropping.  Some of the results look quite decent.


Well, well, if it isn't Mr Owl hiding in the light trails.  Told you he'd show up.  This was achieved by adding layers on top of the original photo and blending them together.  I had to experiment with the opacity to get the blend to look right.


So there you have it.  A Monday night well spent methinks.

Shameless plug in - check out www.myspace.com/imogenskiss


Assignment (Unit 101-105) - Idea Development - WWII: The Story So Far

After finally giving myself a slap around the chops I decided to press forward and get my WWII theme up and running.  This ultimately meant I would have to splash out some cash and ask lots of people for favours.

First, here's the bad news.  I have no money.  Well, I had money until I discovered eBay mobile.  It's just so damn easy to spend a fortune whist sitting in my works canteen.  I still need quite a lot of things.  A British uniform and weapons being my main stumbling blocks at the moment.  Now seriously, who would have thought it would be so hard to come across some authentic WWII guns.  I do have ways around the gun thing though.

The good news.  I have managed to acquire quite a few things off my checklist.  Most notably some fine steel British and German helmets, a German bayonet, gas mask, shells, an ammo crate and various other bits and pieces to add to the theme.  I am currently winning a bid for a German soldiers jacket on eBay and there's only three hours and 39minutes to go so I'm keeping my fingers crossed on that one.  I have also conned two of my friends into starring in my shoot.  I'm sure ill have to pay them with beer though.

I think I have some great stuff and aim to get some test shots done either this week or next week.  I'm just waiting for my extras to sort out some days off so I can dress them up and shoot them.  Not literally.  Well, yes literally actually but with a camera, not guns.

I'm really excited about the prospect of shooting these images.  After all, they have been in my head for such a long time now that I know exactly what I want to capture and how the end results should look.  I have sketched out some of the scenes I'm going to shoot and this should allow me to set up my shots and compositions relatively quickly.  I have also asked my brother to come and document my shoot for me with his camera so everybody can see a genius at work... ha!

For my shoot I have the following equipment at my disposal,
  • Sony Alpha 200 DSLR,
  • Sony Alpha 230 DSLR,
  • Sony DT 18-70mm f3.5-5.6 lens,
  • Sigma 70-300mm f4-5.6 APO DG MACRO lens,
  • Remote Shutter Release
  • Polarizing filter
  • Tripod
So I'm pretty much good to go as soon as I get the rest of my props.  My main concern is getting arrested for buying all this Nazi memorabilia off eBay.  I'm not a Nazi!

Assignment (Unit 101-105) - Research - Man Ray

Man Ray

The whole Dada and Surrealist movements have been a great source of inspiration for a lot of my own projects.  If I had to fall back on my surrealist theme I would love to do something from the Man Ray school of art.  Emmanuel Radnitzky (Man Ray) was one of many influential artists who embraced the Dada movement.


Observatory Time (above) is one of Man Ray's most reproduced works. I read somewhere that this image was created after Man Ray's relationship with photographer Lee Miller ended and the lips in the sky are a painted reproduction from a photo of her.  Looking at the way the image has been composed, it seems to me that the bottom half of the frame could be reality (the photograph part) while the painted top half could be a dream sequence. What's the significance of the chess set? Who knows?


Le Violin De Ingres was inspired by the painter Jean Auguste Dominique Ingres.  This photograph of model (and Man Ray's lover at the time) Kiki De Montparnasse (Alice Prin) was achieved by painting the f-holes of a violin onto the original photograph print.  This print was then re-photographed.  The armless Kiki (as a violin) is an unusual and slightly humorous picture, the composition reminds me of Joel Peter Witkin's Woman Once A Bird which is why this particular image appeals to me.  You cant help thinking that maybe Man Ray is stating something rather more sinister.  Maybe the fact that Kiki is his instrument to play as and when he pleases.


Tears is a very simple yet stunning photograph.  Dating back to the time of his breakup with Lee Miller you cant help but feel the influence she must have had on him.  Maybe the fact that the tears are fake may show some resentment towards his former lover.  I love the closeness of the crop particularly in this photo.  It's all right there, in your face. 

This final image is possibly one of my personal favourites.  I love the composition, the subtle lighting and the transition between the darkness and light.  The unnatural position of the woman (again showing no arms which seems to be a bit of a theme with Man Ray) seems to suggest a lifeless body possibly recently passed away.  The surrounding darkness could be a representation of death or hell while the fact that the body is beautifully lit suggests heaven or an angelic state.  Maybe I'm just trying to over think things but that's partly down the the beauty of this photograph.  Wether Man Ray meant to portray heaven and hell in this photo I'll never know.


"It has never been my object to record my dreams, just the determination to realize them."  - Man Ray